Phase 1: PREP
- Brainstorm
- Choose Packaging
- Conceptualize
Brainstorm
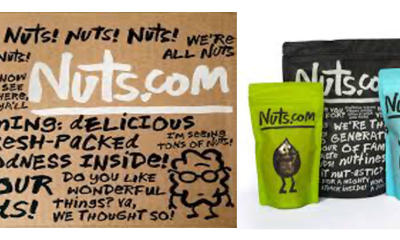
Research similar products.
What packaging do they use?
What kind of experience do you want your customer to have?
Choose Packaging
You cannot start silk printing until you know what you are printing on.Choose your container and closure.
Conceptualize
Advertisement
Visualize your design,decide number of colors and panels.Gather examples of artworks that you like.
Phase 2: ART
- Create Template
- Set up artboard
- Add no-print Zone
- Create Artwork
- Layers
- Barcodes
Note about the Art
For the advanced designer, all the steps on the art path are going to make sense.If they do not,hire one of our designer.
Note About Film
When you are ready for films.that’s when you turn it ever to us.We get the films, we make the screens and we get it printed.
Create Template
Advertisement
Use a vector graphics program like adobe illustrator to create a canvas for your artwork.
Set up artboard
Set artboard width to the full circumference of bottle,set height at least 1/4 less than printable surface height.
Draw Guides
Draw Panel guides,2-4 is typical.A panel is a content block. This project is set up for two panels(front and back).
Add no-print Zone
Advertisement
Add guide 1/4 from either edge.This lets the squeegee lift of the screen.No art or text should enter this area.
Create Artwork
Use guidelines and add content.Art should be vector based.Avoid Gradients,halftones andd photos.
Layers
Each print color should be on its own layer.This will ensure your colors layer properly.In this example,Orange goes down the first.
The front Panel
The front panel should not exceed 29% of the total circumference of the bottle.This will ensure you don’t have to rotate the bottle to read it.
Barcodes
Barcodes can be silk printed. Make sure that the bars are the darkest color(In this case,the color of the bottle is darkest).
Phase 3: FILM
- Prep Artwork
- Print Film Positions
Prep Artwork
Your artwork needs to be a vector file with colors separated to layers,paths flattened fonts outlined,colors changed to black, and each layer saved as PDF with the resolutions maximized.
Print Film Positions
Your digital artwork will be printed by a special high density printer on the sheets of transparent plastic.
Phase 4: Screen
- Make screens
- Coat screens
- Burn screens
Make screens
Advertisement
A screen is made for each film positive.Silk is hydraulically stretched and glued to a frame.
Coat screens
Light-sensitive water soluble emulsion, or gule, is spread onto the silk.
Burn screens
The film positions are burned into the screen by exposing the emulsion to a powerful UV light.
Note about Printing
The print process may vary from shop to shop.
Here is what you can count on through 2 colors cost more that 1,3 cost more that 2,you get the idea.
Phase 5: Print
- Mix Ink
- First Pass
- Dry
- All done!
- Second Pass
- Finish first pass
Mix Ink
Ink colors are mixed by using the pantone matching system color book.
Print
Orange ink is poured onto the screen,the bottle is inserted and ink is squeezed onto the bottle.
First Pass
The bottom color(called the first pass) goes down first,in this case orange.
Dry
The bottle are conveyed through a furnace to dry. Some shops use the UV light to “cure” the ink.
All done!
The bottle are either and packed or tumble packed,taped up and shipped to your door.
Second Pass
Yellow ink is poured onto the new screen,the bottle is inserted and registered, the yellow ink is squeegeed on top of the dried orange ink.
Finish first pass
Once the first pass is done, the screen is removed and cleaned.The second screen is inserted into the print machine.
Editorial Note: This post was shared by a member of the BXP community and edited by our editorial staff. Do you have news to share with our readers or a package design project that you are especially proud of? Click here to learn how you can become a contributing member of the BXP Magazine community.